
From site assessment to base course, the real-world playbook for building a tall, structurally sound retaining wall that lasts.
Watch the full build in the video above before diving into the steps below.
Building a retaining wall that stands 8 feet tall is a completely different challenge from one that stands 3. The taller the wall, the more the ground beneath it, and the soil pressing against it, determines whether it performs for decades or starts failing after the first hard winter.
This guide combines both parts of our G-Force retaining wall build series into one complete resource, covering every phase: site assessment, geogrid base reinforcement, drainage, compaction, and precision base course installation. Whether you're a landscape contractor planning a reinforced retaining wall or a homeowner trying to understand what a proper installation involves, this is the full picture.
Why Geogrid, and Why It Matters More Than You Think
Most people associate geogrid with backfill reinforcement, the layers placed behind a tall retaining wall to anchor it into the hillside. That's valid. But geogrid is also one of the most underused tools for base stabilization, especially on sites with clay-heavy or frost-prone soil.
On this project, the subgrade was clay. In a high freeze-thaw climate, clay expands when it freezes and contracts when it thaws, creating ground movement that pushes against your wall from below. Geogrid, layered strategically into the base, stops that movement before it starts.
The Project: What We Were Working With
This build was an 8.5-foot geogrid-reinforced retaining wall using the Techo-Bloc G-Force system, installed between two homes on a shared driveway. The site came with several compounding challenges:
- Tight work zone with limited staging space and all utilities already in the ground
- Over-excavated subgrade from a neighboring pool installation, creating a stability problem before a single block was placed
- Two walls meeting at 90°, built simultaneously to accommodate steps
If you've over-excavated: stop. Don't compact your way out of it. Follow the steps below to amend properly from the start.
Site Preparation and Base Reinforcement
Step 1: Set Your Elevations First
Before touching the subgrade, mark three critical benchmarks: top of cap, top of wall, and bottom of the first course of block. These reference points control the entire build. Get them right early and every course goes up clean.
Step 2: Amend Clay Subgrade
Clay soil and retaining walls are a bad combination in freeze-thaw climates. A quick test makes this clear: add water to a clay sample and watch it turn sticky and pliable, that's what's happening beneath your wall every spring under thousands of pounds of pressure.
The fix: integrate clean angular stone into the clay subgrade to increase its bearing capacity. This is non-negotiable on clay sites and one of the most common steps skipped on walls that fail prematurely.
Step 3: Build a Clean Stone Subbase
Lay a subbase of ¾-inch clean angular crushed stone. Angular material interlocks tightly under compaction in a way that round stone never will. This is the foundation everything above it depends on.
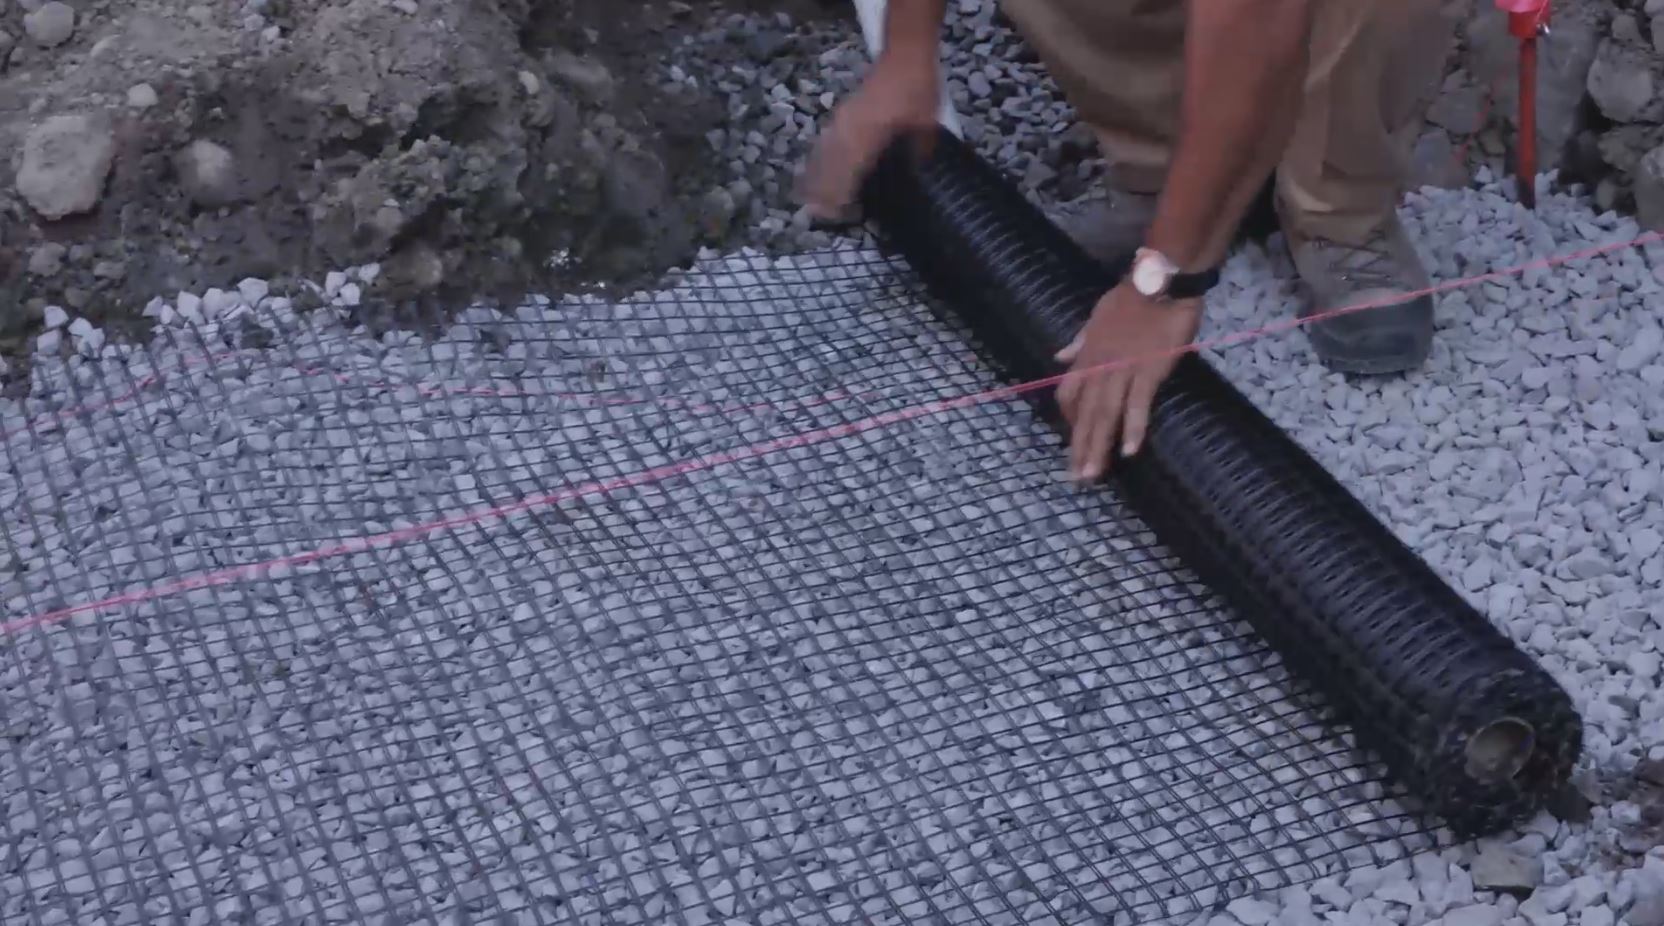
Step 4: Reinforce the Base with Geogrid
For this project, we installed Gator Grid GG 50-50 by Alliance as an intermittent layer within the subbase, not just behind the wall. With 3 inches of clean stone compacted on top, the properly tensioned geogrid creates a mechanically stabilized layer that resists movement from frost pressure and heavy loads.
Pro tip: Using geogrid to stabilize your subbase is one of the highest-value moves on a frost-prone site, and it costs a fraction of what a wall repair does.
Step 5: Install Non-Woven Geotextile Fabric
On this project, water couldn't exit behind the wall, so it needed a managed path through the base. We installed Gator Fabric GF 4.4 by Alliance between base layers to prevent fine particles from migrating into the drainage layer and clogging it over time. Use geotextile any time you're transitioning between base materials or managing drainage without a rear outlet.
Step 6: Add Densely Graded Base Stone
With the geotextile in place, add your densely graded stone layer. This gives you a stable, well-draining platform ready for compaction and block installation.
Step 7: Compact to the Right Density
This is where many retaining wall installations quietly fail, not from bad blocks, but from inadequate compaction.
On this project, a standard plate compactor produced almost zero measurable compaction after five passes. It looked like it was working. The readings said otherwise. We replaced it with a heavy compactor capable of achieving 98% Standard Proctor density, and the difference was immediate.
Before moving on, confirm: Are you hitting 98% Standard Proctor? Have you verified with a density test, not just a visual check? On a wall this tall, proper compaction is the difference between a base that holds for 20 years and one that shifts after the first winter.
Setting the Base Course with Precision
A reinforced, compacted base gets you here. Now comes the phase that sets the trajectory for everything above it: the first course of block. On an 8.5-foot wall, errors at the base course compound with every row that follows.
Paver Pete worked with Phil Bahler from Pave Tool Innovators to demonstrate a faster, more precise, and less physically demanding approach than traditional methods.
The Old Way vs. the Better Way
The conventional approach, workers on their knees, tapping blocks with a mallet, pulling and resetting low ones, is slow, inconsistent, and hard on the body. There's a better system.
For this project, we ran two Quick-E-Wall Screed systems from Pave Tool Innovators simultaneously, one per wall, combined with a laser rod for elevation control. It let us set bedding and establish the base course on both walls at the same time, cutting time and physical strain significantly.
How the Laser Rod & Screed System Works
Step 1: Position the laser on a stable, fixed surface (we used the pool deck) and power it on.
Step 2: Set the benchmark. The laser rod sensors establish a zero-elevation reference point that every subsequent measurement ties back to.
Step 3: Set base elevation at one inch below finished grade. Place the laser rod on a pipe, drive it to depth with a tamper, and check both front and back. When the sensor gives a constant beep, the pipe is set.
Step 4: Lock each pipe with #9 stone so it can't shift during screeding. Repeat across the full wall run.
90° corner tip: Set the return wall pipe at a 45° angle to the corner. This lets you screed across both walls cleanly and reduces the number of pipes needed.
Why G-Force for a Wall This Tall?
The Techo-Bloc G-Force wall system is engineered for high-strength structural applications, exactly what a challenging 8.5-foot build on amended subgrade demands. Its smooth modern finish works on visible residential sites, matching corner units handle clean 90° transitions, and its structural performance doesn't ask you to trade aesthetics for durability. For walls in the 6–10 foot range on difficult sites, it's one of the most dependable systems in the Techo-Bloc lineup.
Key Takeaways
- Stop and amend over-excavated subgrade, don't build on compromised ground.
- Use geogrid in your base, not just your backfill, on frost-prone or clay-heavy sites.
- Verify compaction with a density test. Visual passes aren't enough on a structural wall.
- Invest in proper setting tools. A laser rod and screed system transforms base course speed and accuracy.
Going Deeper: Pre-Engineering & TechoSpec Resources
Need wall-specific engineering data, geogrid specifications, or pre-engineered section drawings? The TechoSpec handbook is your go-to reference for Techo-Bloc retaining wall systems.
Browse SRW Pre-Engineering Sections →
Frequently Asked Questions
How tall can a retaining wall be without geogrid? Walls up to 3–4 feet on stable, well-draining soil can often be built without geogrid. Beyond that height, or on clay, frost-prone, or unstable sites, geogrid is typically required for structural performance and to meet engineering standards.
What type of geogrid is best for retaining walls? Biaxial geogrid (like the Gator Grid GG 50-50 used here) is ideal for base stabilization, distributing load in multiple directions. Uniaxial geogrid is more commonly specified for backfill reinforcement behind taller walls where the primary load direction is defined.
What is the best base material for a retaining wall? ¾-inch clean angular crushed stone is the industry standard. It compacts tightly, drains freely, and locks together under load. Avoid pea gravel, and never use native soil as base material on a structural wall.
How deep should a retaining wall base be? A minimum of 6 inches of compacted base is standard for most residential walls. Taller walls and poorer soils require more. Always follow your product's installation guide and verify with local engineering requirements.
What is Standard Proctor density? It's a lab-measured benchmark for compaction. Achieving 98% Standard Proctor means your base is compacted to near-maximum density for that material, giving you the load-bearing capacity and settlement resistance a structural retaining wall demands.
What compactor should I use for a retaining wall base? Your compactor needs to match the material and lift thickness. A standard plate compactor is often insufficient for deep bases, as this project showed. Use a heavy compactor rated for 98% Standard Proctor and confirm results with a density test, not a visual pass.
For geogrid reinforcement specifications beyond the scope of the TechoSpec handbook, contact your local Techo-Bloc representative for project-specific engineering guidance.