
Paver Pete explains different soil stabilization methods and how to use flowable fill.
Soil Subgrade Amendments
Different options used for stabilizing soil subgrades are presented.
In this case, we have a sandy soil, but the predominant soil type in North America is a clay type soil.
If it were clay, we would need to amend the soil to get it to the density we want to achieve.
OPTION 1: Try to compact it.
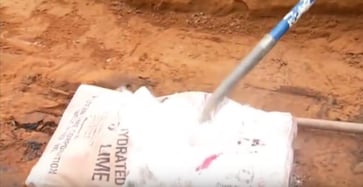
OPTION 2: Lime chemical amendment: Chemically changes the composition of the clay soil by releasing the water and getting it to a certain level of density.
We don’t need to till it into the soil, just rake it into the surface.
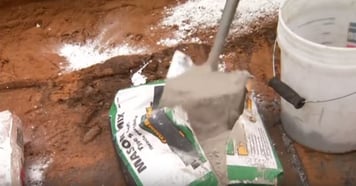
OPTION 3: Type S mortar mix chemical amendment: We recommend choosing a high lime content Portland mix. The straight Portland will crack during the freeze-thaw cycles and not to able to revert back to its original shape.
Once the material is incorporated into the subgrade, we just need to rake it in and it will change the chemical composition of the soil by starting a wicking process. Use about a 50-pound bag per 100 square foot of trench area and give it time to work before compacting.
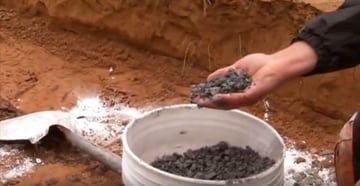
OPTION 4: Clean #57 stone: It has ¾ inch angular particles. Spread it over the subgrade and rake it in. You can combine it with the type S mortar mix and eventually run the compactor over it.

OPTION 5 (NOT RECOMMENDED): ASTM C 2940 crusher type material: It is not recommended because it has a high percentage of fines, and a clay soil already contains fines.
Once amended, the base can be installed. Flowable fill, a self levelling liquid concrete is our choice on this project. Densely-graded stone, like ASTM C 2940, or open-graded stone, like AASHTO 57, are the more common alternatives.
Grade Stakes for Flowable Fill
Set your grade stakes to the appropriate height for the flowable fill.
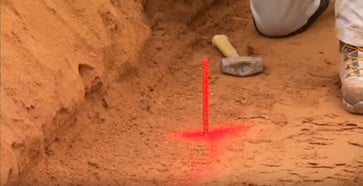
STEP 1: Set rebar into the soil. We use them not to reinforce the concrete, but to help us visualize and know when we reach our base’s finished height.
In this case, it needs to measure 8 inches above the soil because that is the height of our base.

STEP 2: Place the other stakes about every 8 to 10 feet to be safe and mark them with paint for better identification.
Forming Step-ups in Flowable Fill Base
Watch how to form step-ups and save on block costs on a segmental retaining wall installation.
We noticed that the land dives down into the grade.
We need to embed about 13 inches of block, but at some point, while moving on this grade, we will embed 15, 20 and 25 inches.
We can fix this by forming step-ups. A liquid concrete flowable fill will level like water does, so the rest of the forming will be done by the trench walls.
We pinned down a composite plastic so we can build our base up and return the wall in.
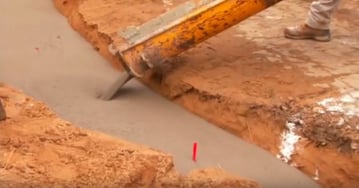
Flowable Fill
Watch the ease and efficiency of the self levelling flowable fill as a base for a segmental retaining wall.
STEP 1: Pour the flowable fill into the trench. Build it to the height of the pins.
This type of material will fill in all the wall imperfections so no compaction or aggregate base are needed in these tight spaces. Here we need to build a return for a wing wall.
STEP 2: Wait 3 hours. Start installing the blocks a few hours after.
VIEW OUR SELECTION OF WALL BLOCKS AND BENEFIT FROM CROSS-SECTION EXPLANATIONS TODAY!


Leave A Comment